

Vue Router, the official router for Vue, makes it doable to construct Single-Web page Purposes (SPAs) in Vue. Vue Router enables you to map your net app’s elements to totally different browser routes, handle your app’s historical past stack, and arrange superior routing choices.
Getting Began With the Vue Router
To get began with Vue Router, run the next npm (Node Package deal Supervisor) command in your most well-liked listing to create your Vue utility:
npm create vue
When prompted whether or not so as to add Vue Router for Single Web page Utility growth, choose Sure.
Subsequent, open your undertaking in your most well-liked textual content editor. Your app’s src listing ought to embody a router folder.
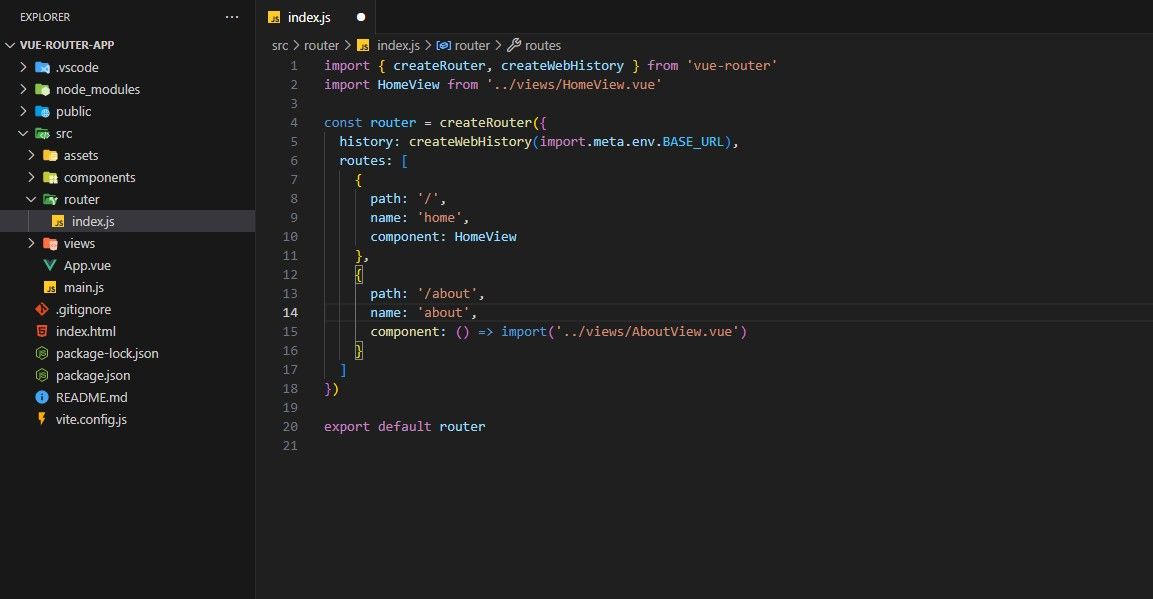
The router folder homes an index.js file containing the JavaScript code for dealing with routes in your utility. The index.js file imports two capabilities from the vue-router package deal: createRouter and createWebHistory.
The createRouter operate creates a brand new route configuration from an object. This object incorporates the historical past and routes keys and their values. The routes key’s an array of objects detailing every route’s configuration, as seen within the above picture.
After configuring your routes, you might want to export this router occasion and import this occasion into the primary.js file:
import ‘./belongings/fundamental.css’
import { createApp } from ‘vue’import App from ‘./App.vue’import router from ‘./router’
const app = createApp(App)
app.use(router)
app.mount(‘#app’)
You imported the router operate into the primary.js file after which made your Vue app use this router operate with the use technique.
You may then apply your routes to your Vue app by structuring an analogous code block to the one under:
<script setup>import { RouterLink, RouterView } from ‘vue-router’</script>
<template> <header> <nav> <RouterLink to=“https://www.makeuseof.com/”>Dwelling</RouterLink> <RouterLink to=“/about”>About</RouterLink> </nav> </header>
<RouterView /></template>
The above code block demonstrates using the Vue Router in a Vue part. The code snippet imports two elements from the vue-router library: RouterLink and RouterView.
The RouterLink elements create hyperlinks to the Dwelling and About pages within the above code snippet. The to attribute specifies the trail to the route you navigate if you click on the hyperlink. Right here, you’ve one hyperlink pointing to the basis route (“/”) and one other hyperlink pointing to the “/about” route.
The part renders the part related to the present route. It acts as a placeholder the place the present route’s content material will render. If you navigate to a special route, the part related to that route will render contained in the part.
Including Params to Your Utility’s Routes
Vue Router lets you move parameters and queries to routes. Parameters are dynamic elements of the URL, denoted by a colon “:”.
To set your Vue Router to have the ability to seize parameters within the app’s routes, configure the particular route in your index.js file:
const router = createRouter({ historical past: createWebHistory(import.meta.env.BASE_URL), routes: [ { path: “https://www.makeuseof.com/”, name: “home”, component: HomeView, }, { path: “/developer/:profileNumber”, name: “developer”, component: () => import(“../views/devView.vue”), }, ],});
The above code block reveals a router occasion with two routes: residence and developer. The developer route reveals details about a selected developer primarily based on the developer’s profile quantity.
Now modify your App.vue file to appear to be the code snippet under:
<script setup>import { ref } from “vue”;import { RouterLink, RouterView } from “vue-router”;
const developer = ref([ { name: “Chinedu”, profile: 2110, },]);</script>
<template> <header> <nav> <RouterLink to=“https://www.makeuseof.com/”>Dwelling</RouterLink> <RouterLink :to=“{ path: `/developer/${developer.profile}` }”> Dev Profile </RouterLink> </nav> </header>
<RouterView /></template>
The above code block units the developer variable as a reactive object with two properties: identify and profile. Then, the second RouterLink part routes to the devView part. Now you can entry the worth of the param you move into the url within the template block or JavaScript block of the devView part.
To entry this worth within the template block of the devView part, Vue gives a $route technique, an object containing properties that element the URL’s data. This data contains fullPath, queries, params, and elements.
Right here is an instance of the best way to entry the actual developer’s profile within the devView part with the $route technique:
<template> <div> <h1>That is developer {{ $route.params.profileNumber }} about web page</h1> </div></template>
The above code snippet demonstrates the best way to use the $route technique to entry and show the worth of the profileNumber parameter throughout the part’s template.
The params property within the $route technique holds the parameters you outline in a route. When Vue renders this part, it replaces the worth of the $route.params.profileNumber with the precise worth you move within the URL.
For example, should you go to /developer/123, the displayed message is “That is developer 123 about web page”.
You too can entry the route data within the JavaScript block of your part. For instance:
<script setup>import { useRoute } from “vue-router”;
const route = useRoute();</script>
<template> <div> <h1>That is developer {{ route.params.profileNumber }} about web page</h1> </div></template>
Within the former code block, you accessed the $route object straight throughout the template to retrieve the route parameters. Nevertheless, within the up to date code block, you imported the operate useRoute() from the vue-router package deal. You assigned the operate to a variable which you then used within the template of your Vue part.
With useRoute(), you comply with Vue 3’s composition API method leveraging the reactivity system. This ensures that the part will robotically replace when the route parameters change.
Including Queries to Your Utility’s Routes
Queries, or question strings, are elective parameters added to the URL after a query mark “?”. For instance, within the route “/search?identify=vue”, “identify=vue” is a question string the place identify is the important thing and vue is the worth.
So as to add a question to a route in Vue Router, you should use the question property of the to object within the RouterLink part. The question property needs to be an object the place every key-value pair represents a question parameter. This is an instance:
<RouterLink :to=“{ identify: ‘residence’, question: {identify: ‘vue’}}”>Dwelling</RouterLink>
After including a question to a route, you possibly can entry the question parameters in your Vue elements. You are able to do this with the $route object or the useRoute operate, just like including route parameters.
This is an instance of how you utilize a question parameter in a part:
<template> {{ $route.question.identify }}</template>
This code snippet demonstrates the best way to entry and render the worth of a question parameter (identify) from the URL utilizing the $route.question object throughout the template of a Vue.js part.
Defining a Fallback (404) Web page
Vue Router lets you outline a fallback route that shall be matched when no different routes match the URL. That is helpful for displaying a “404 Not Discovered” web page.
Right here’s how one can outline a fallback route with the Vue Router:
{ path:‘/:pathName(.*)’, identify: ‘NotFound’, part: () => import(‘../views/NotFoundView.vue’) }
The /:pathName half signifies a dynamic phase within the URL, and (.*) is a JavaScript common expression that matches any characters after the dynamic phase. This enables the path to match any path.
When a consumer navigates to a URL that does not match every other routes, Vue will render the NotFoundView part. You utilize this method to deal with 404 errors or show a fallback web page when a requested route shouldn’t be discovered.
Be taught to Create Animations in Vue
You discovered the best way to add parameters and queries to your utility’s routes. You additionally discovered the best way to outline a fallback web page to deal with 404 errors. Vue Router gives way more performance, like setting dynamic and nested routes.
Including animations and transitions between parts on an online web page can considerably improve the consumer expertise. You must be taught to create transitions and animations in Vue to create a smoother, extra participating, and general higher web site.

")


/cdn.vox-cdn.com/uploads/chorus_asset/file/25693470/ecobee_x_Yale_x_August___1.jpg "Now you can unlock your door from Ecobee’s app")


")
")


